
Hi and welcome to the video creation kit!
This kit is designed for anyone who wants to use video to grow their busines,
It’s perfect both for people who have never posted a video before, as well as for those who already feel confident and are looking to improve their results.
The process of creating each video consists of several steps:
1.Coming up with an idea and writing a script
2.Filming the footage
3.Editing the footage
4.Distributing the video
This kit walks you through each step of the process,You can follow the guide in order or jump straight to the section that’s most relevant to you right now.
Now it’s time to discover what works best for you, good luck!
Part 1: Pre-Planning
Defining Your Goals
Before you decide what to film, it’s important to ask yourself: What am I trying to achieve?
Videos can help you reach many different business goals, but if you don’t start by clearly defining those goals, your chances of achieving them drop significantly.
Note: I’m not referring to your overall business goal—which is the same for every business: to attract clients and make money. That’s obvious, and it’s always the bigger picture. Instead, we’re focusing on more specific and precise goals. Here are some examples that might be relevant for you:
- Increase visibility – Reach a new audience that hasn’t discovered you yet.
- Deepen familiarity – Show more aspects of your work to your existing audience.
- Build a community – Grow your following on social media.
- Refine your audience – Communicate clearly who your ideal clients are—and just as importantly, who they are not.
- Social proof – Showcase your work and the results you’ve helped your clients achieve.
- Warm up your audience before a launch – Prepare your audience for a new offer.
- Strengthen personal connection – Show who you are to attract aligned clients who want to work with you.
- Present your business values – Share the values that guide your work.
Please don’t skip this step. When you act with clarity and intention, the impact of your content grows significantly.
Finding an Idea for Your Video
Now that you know what you want to achieve—because you’ve defined your goals—it will be much easier to decide what to film.
The ideas you’re about to read are based on my experience and the experience of my clients. They’ve proven themselves both from a business and marketing perspective, as well as in terms of performance across different platforms—which is exactly why I chose to include them here.
I recommend going through all the examples first, and only then choosing the idea that feels easiest for you to start with.
Expectation VS Reality Video
“Expectation vs Reality” videos are a genre that gently pokes fun at Instagram culture, so it’s no surprise they perform so well on social media.
After all, we’ve all ordered something online only to receive a disappointing version of what we saw on the website,
Or visited a famous tourist attraction just to find it packed with people all trying to get the perfect photo.
So at least we can laugh about it together, right?
How to film an Expectation vs Reality video
The most important thing to remember about this format is that the humor comes from the contrast.
You start by showing the expectation, and only then reveal what actually happened.
The bigger the gap between the two, the stronger the comedic effect.
Another option is to flip the format:
start with low expectations and then reveal a surprisingly good reality.
Video Example
Types Of People Video
“Types of People” videos are one of the easiest video formats to create because the idea is already built into the structure of the video.
The format is simple: you choose a situation, topic, or experience people recognize, and then present the different “types” of people within it in an exaggerated, relatable, or funny way.
For example:
Types of customers before buying
Types of people at the gym
Types of drivers in traffic
Types of clients during a Zoom meeting
A good way to choose a topic is to think about situations your audience experiences regularly.
Ask yourself:
What kinds of behaviors keep repeating themselves?
What personality types always show up?
What situations would make someone say “that’s so true”?
Once you choose your “types,” the next step is making each character feel visually different. Think about what makes each one recognizable:
Their body language
The way they speak
Their facial expressions
Their energy or behavior
The clearer the differences between the characters, the more entertaining the video becomes.
You can make the separation even stronger by changing small things between characters like accessories, hairstyles, outfits, camera angles, or editing transitions.
Video Example
Golden Tip Video
Let’s talk about the most important question you should ask before filming a video,
It’s not “Will this video bring me clients?” and it’s definitely not “Does my nose look this big in real life?!”
The real question is: Why would someone choose to watch my video specifically?
And the answer is simple – because they want to get the tip you’re about to give them.
A tip video is a concept that’s hard to get wrong,
In this type of video you can demonstrate your knowledge and professionalism, and most importantly – it provides real value to the viewer, immediately makes people like and trust you.
These are the types of videos that will bring you new followers and help people understand that you actually know what you’re talking about.
Goals you can achieve with tip videos
- Consistent marketing that builds trust – Tip videos are classic marketing content that you can use across all your platforms.
- Authority building – A tip video demonstrates the depth of your knowledge and positions you as a serious professional who knows their field.
Video Example
Part 2 – Filming Your Video
Recommended Equipment for Filming Yourself
Before you pull out your credit card and start ordering, I want to say something important:
most of the items listed here are not necessary for you to start filming.
When learning something new, we often tend to rush into buying all the tools and accessories we think we need (hello running shoes and yoga mats collecting dust in the corner) But the truth is -you already have the most important tool to start filming: your phone.
If your phone was purchased in 2022 or later, you can already create high-quality videos without a ring light or microphone, so my recommendation is to start filming first, and only then buy what you actually feel is missing.
The one exception I do recommend from the beginning is a tripod – so you could easily film yourself.
Tripod
A tripod is the most important tool for anyone who wants to film themselves on video, for two main reasons:
- You don’t need anyone else’s help to film you, you can record yourself anytime, which gives you much more creative freedom to experiment and helps you become comfortable on camera much faster.
- When you hold the camera in your hand instead of placing it on a tripod, the footage can come out shaky and look significantly less professional.
Due to the growing popularity of video content, you can now find a wide variety of tripods on the market depending on your needs: there are tabletop tripods, lightweight travel tripods, overhead tripods for filming products, and more.
Tabletop Tripod
A tabletop tripod is a great item to keep on your desk so you can document your daily work and use your phone hands-free whenever needed.
The issue with many tabletop tripods is that they are designed only to hold your phone in a fixed position, without allowing you to adjust the angle, this is a problem, because being able to change your filming angle is essential for finding the most flattering shot.
That’s why I recommend this specific model, which includes a ball head and a secure phone holder.
This combination allows you to freely adjust the angle and tilt it downward without the phone falling, giving you much more flexibility and control over your shots.
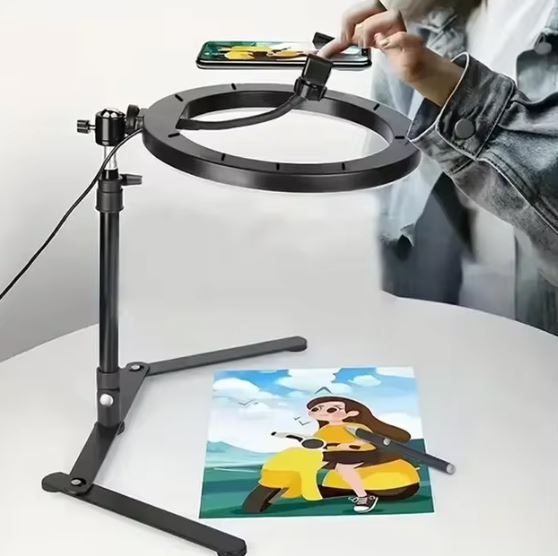
Overhead Tripod
An overhead tripod is mainly designed for anyone filming products, cooking videos, DIY content, and similar formats.
You can use a regular tripod for these types of videos as well, but without a dedicated overhead setup, the tripod pole will often appear in the frame – which is something you usually want to avoid.
The tripod I’ve included here also comes with a ring light, but you don’t have to use it,
you can film and test how your video looks with the light on or off, and then decide what works best for you.
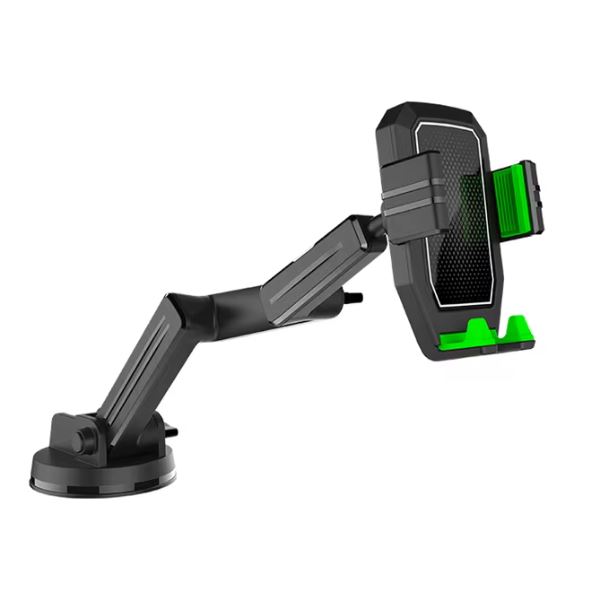
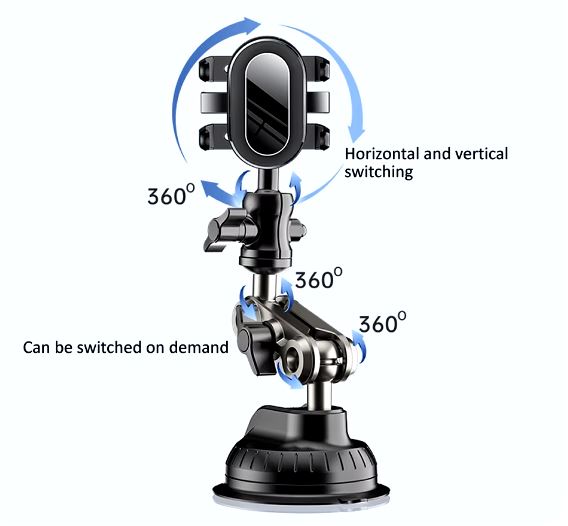
Car / Mirror Tripod
This is probably not what this product was originally designed for, but the truth is the phone holder many of us already have in the car is actually super useful when you want to film yourself!
You can use this mount to film yourself in the car, which is something many people love doing (myself included).
But it’s also useful at home: you can attach it to your bathroom mirror and film yourself while getting ready or doing your makeup, or even stick it onto a window in your living room.
This way you don’t need a standing tripod, and you also get great natural lighting from outside.
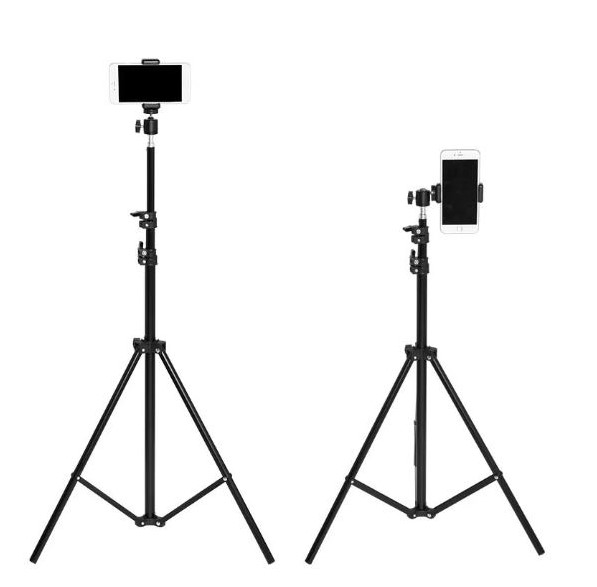
Standing Tripod
This is the tripod I use on a daily basis.
At my home, you’ll almost always find at least one of these set up somewhere at any given time (yes I have a few) and I also take it with me for outdoor shoots.
The trick is that this isn’t originally a tripod- it’s actually a lighting stand, that’s why it’s much taller than standard tripods and can extend up to 2 meters, compared to regular tripods that usually go up to around 1.60 meters.
Why does this matter?
Because when I film myself, I prefer placing the camera slightly above eye level and tilting it downward, this angle is more flattering than filming straight at eye level.
Please note that the tripod does not come with a phone holder, so it needs to be purchased separately.
I recommend investing a bit more in the one I’ve linked, since cheaper versions tend to break quickly.
In addition, I recommend adding a 360° ball head, which allows for flexible angle adjustments – which, as I’ve already mentioned, is essential.
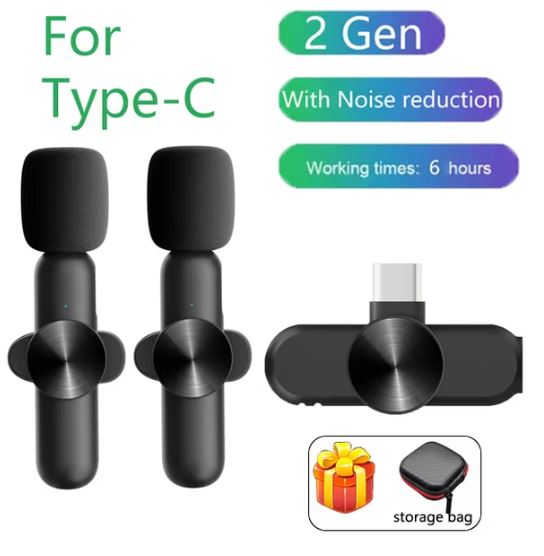
Microphone
If you want, you can improve the sound quality of your videos with a relatively small investment of a few dozen to a few hundred dollars.
I always recommend adding captions to your videos, so in my opinion it’s not a major issue if the audio isn’t perfect – since most people watch videos on mute anyway, that said many people still appreciate the upgrade in sound quality.
Between us though, the role of a microphone in videos is often less about improving sound and more about improving how we feel while filming.
I often recommend getting a microphone for people who aren’t used to filming themselves, simply because having something to hold helps relax your body language, making you look much more natural and comfortable on camera.
Important: When ordering, make sure you select the correct connection type for your phone.
Low budget
A no-name lavalier microphone that connects directly to your phone, for its price the sound quality is actually not bad at all!
Direct link to the product
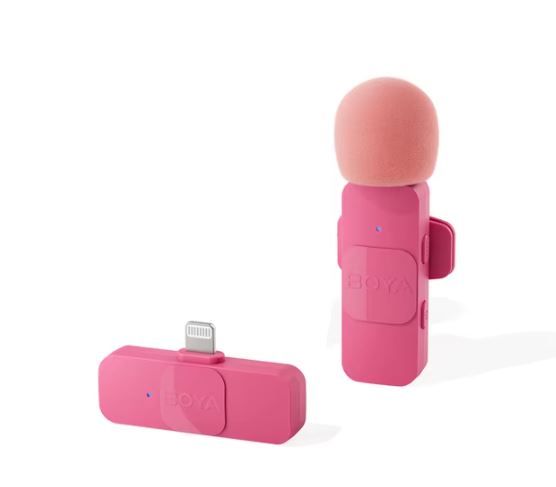
Mid budget
BOYA is a Chinese microphone brand that offers a wide range of products – from very affordable options to more professional-level gear.
This is the microphone I personally use for my own solo filming, and I find it more than sufficient – especially the pink version, because everything is better in pink.
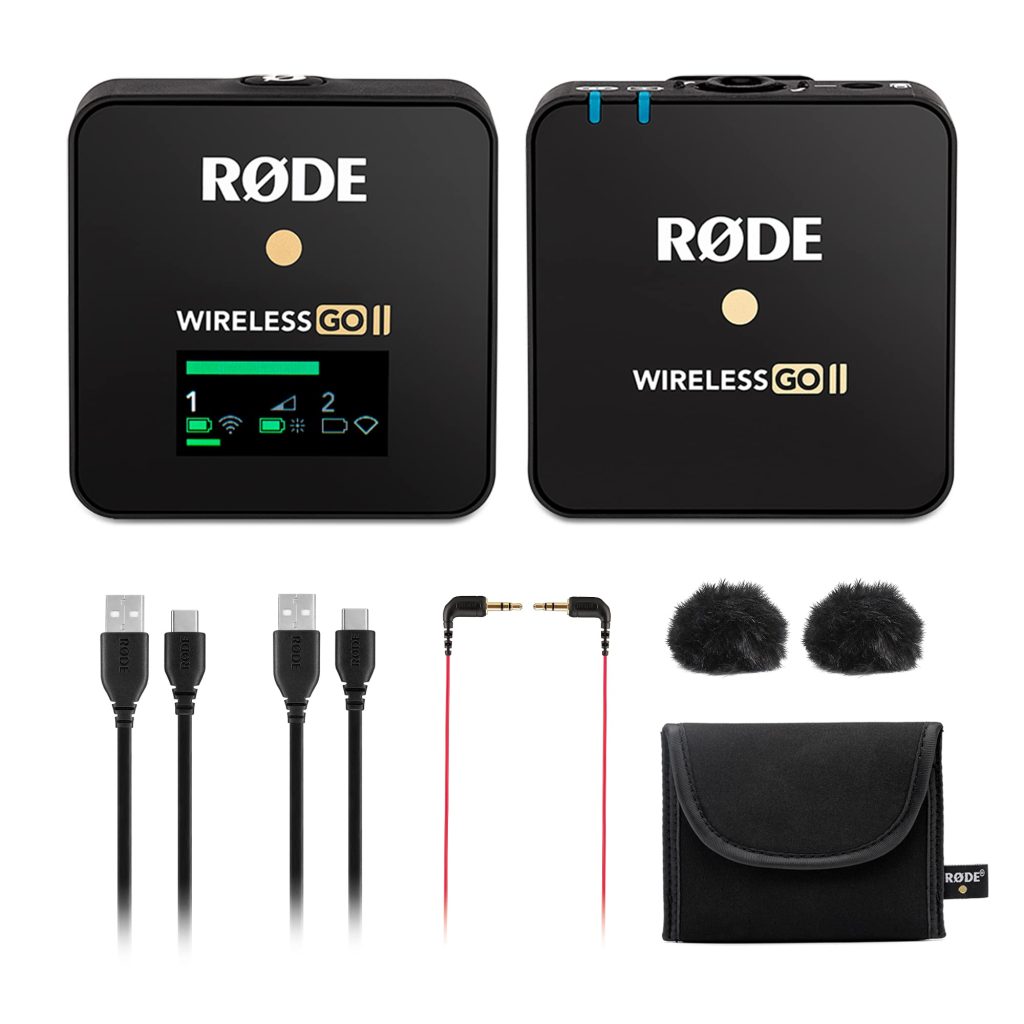
High budget – Rode Wireless Go II
Rode is a well-known and established microphone brand, mainly producing professional equipment. This specific model has become one of their flagship products in recent years due to the rise of video content on social media.
I’ve been using it for about 5 years, and I’ve never had any issues with it, which is why I confidently recommend it as a solid investment.
Important: This microphone is designed for cameras and not directly for mobile phones.
Lighting
Lighting is the most important element in video and photography.
After all, the literal meaning of the word Photography is “drawing with light” and it’s the first thing you learn in any photography school.
So why am I mentioning lighting at the end of this guide instead of the beginning?
Because working with artificial lighting is a whole discipline of its own, there’s no real need to dive into it when you’re not a professional photographer, but simply creating videos for social media.
You can just film during the daytime and take advantage of natural light without overcomplicating things – because trust me when I say this as a professional video photographer, it’s not as simple as it looks.
That said, if you still want to experiment with artificial lighting, here are a few options that are relatively easy to use and beginner-friendly.
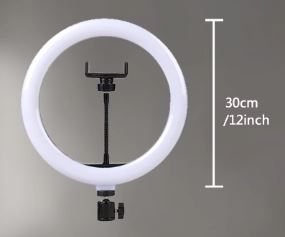
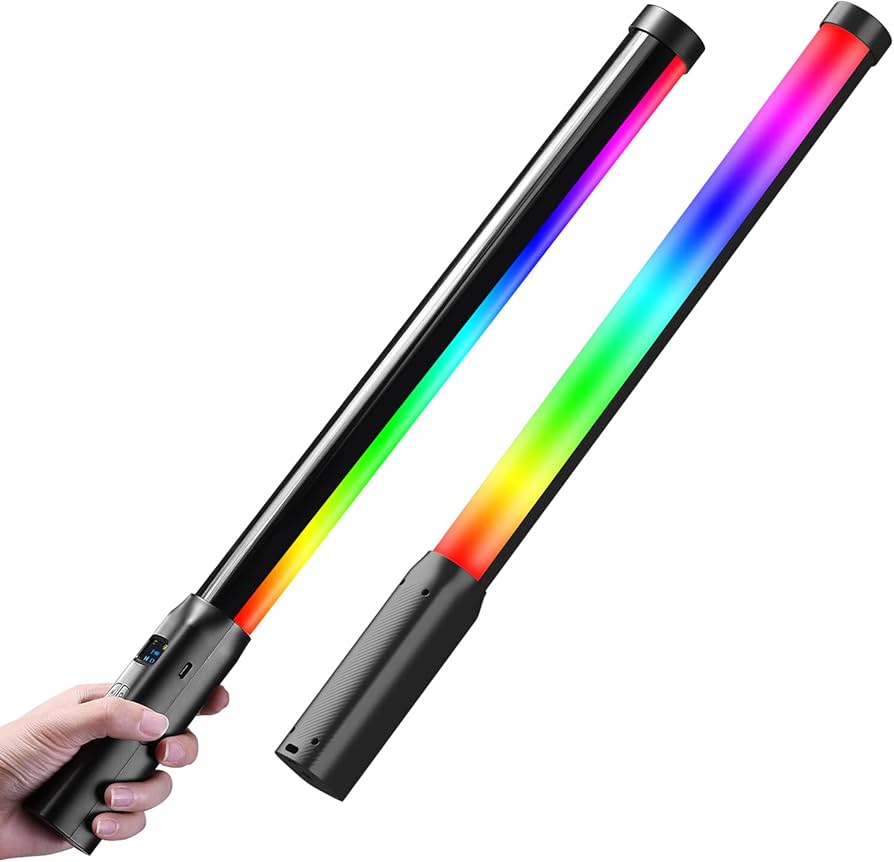
Ring Light
A ring light with a standing tripod that includes multiple features, allowing you to adjust the lighting to your preference: warm or cool tones, a dimmer to control intensity, and more.
Colored Background Lighting
This type of colored background lighting is often associated with gaming creators, but I’ve also seen many content creators incorporate it into their videos – especially those who film in a fixed space at home and want to create a consistent setup across their content.
It’s important to note that in order to achieve the dramatic effect this type of lighting can create, you need to block out natural daylight in the filming space.
Also, this light is meant to be an addition for atmosphere, you’ll still need proper lighting that directly illuminates you.
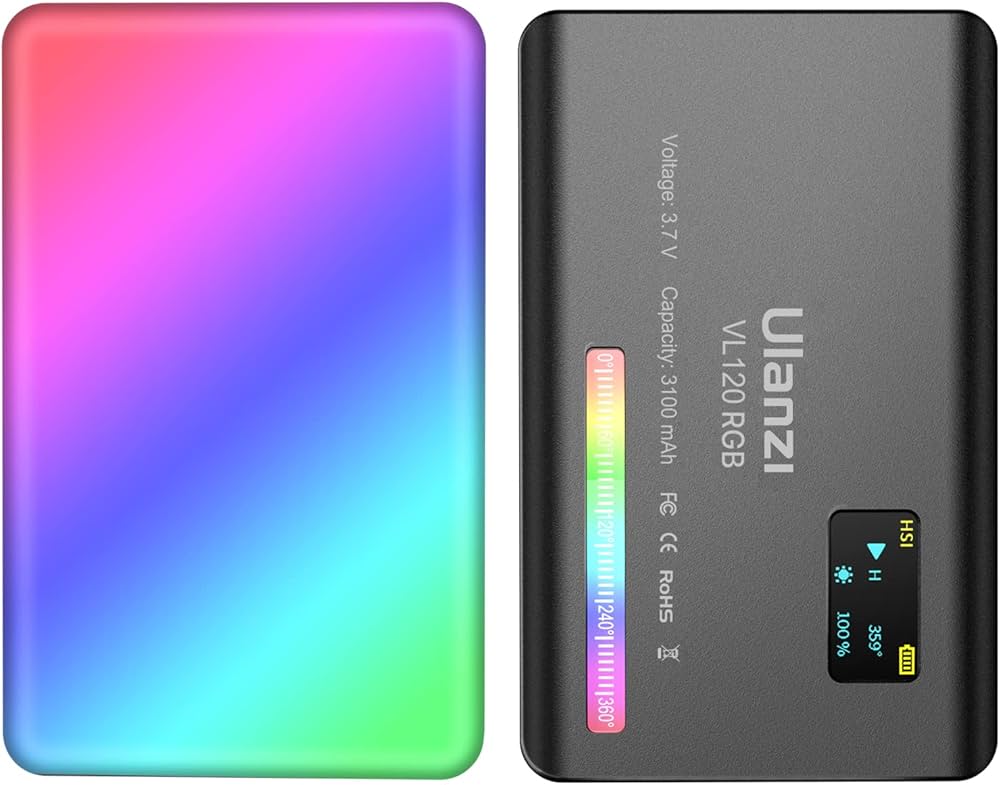
Portable Light
A small portable light that you can take anywhere.
It’s useful at home – for example, if you’re doing Zoom calls in a dark room, and also when filming outdoors in the evening, especially for selfies, since it only covers a small area.
This light also includes an option to change the color temperature.
Part 3 - Editing Your Video
Before we go deeper into the question of which editing app you should use, I want to make sure we’re aligned on what “editing” actually means.
Video editing is the process where you take the raw footage you filmed and cut out everything you don’t want in the final video – such as bad takes, mistakes, interruptions, and so on.
On top of what remains, you then make what we call “adjustments- adding captions, music, effects, and more, until you reach a version of the video you’re happy with and ready to publish and use.
At its core, editing is the same process across all software.
That’s why the question of which app to use is less important than you might think.
My recommendation is to choose one platform and stick with it until you become confident and efficient using it.
A more important question is whether you’re going to edit on a computer or on your phone.
The difference between these two options is significant, which is why I focus on that rather than reviewing editing apps themselves – because in the end, they all do the same thing.
It’s also important to note that I’m referring here to beginner-friendly tools, not professional video editing software like Premiere Pro or DaVinci Resolve.
Those tools are much more complex and expensive, and there’s no real need to use them when your goal is to create simple, effective videos for social media as easily as possible.
So let’s go over the pros and cons of editing on a computer versus editing on a phone, so you can make an informed decision.
My recommendation for each option will appear after the breakdown of advantages and disadvantages.

Video Editing on a Computer - Advantages
Precision and attention to detail
Using a mouse and keyboard allows for much greater precision and control, which not only makes editing easier but also significantly improves the final quality of the video.
File management
File management on a phone = chaos.
And if that’s not your experience please teach me your ways.
Computers offer much better file organization, making it easier to store, organize, and transfer large video files.
As someone who films a lot of content – this is absolutely essential.
Advanced features
While mobile editing apps today offer a wide range of effects, graphics, and tools, there are still features that are only available in desktop editing software.
Video Editing on a Computer – Disadvantages
Cost
First of all, many people today don’t even use a computer regularly, so purchasing one specifically for editing is only recommended if you plan to build a career in this field.
In addition, desktop editing software tends to be more expensive than mobile apps, and it may not be worth the investment if your needs are relatively basic.
Lack of mobility
Even if you have a laptop, it will always be easier to work from a smartphone.
For many people, this is a significant factor – such as social media managers who need to upload on the go, digital nomads, or anyone who enjoys working from cafés.
Recommended Software for Computer Editing
The software I recommend for editing videos on a computer is called Filmora.
I have been using Filmora for almost 10 years now, and consistently recommend it for several reasons:
Ease of use – Filmora’s interface feels intuitive and user-friendly.
Price – The cost is very reasonable compared to the value it provides.
Technical capabilities – Filmora includes many features that help create more engaging videos. Some of these are part of paid add-ons, but even without additional purchases, there are still plenty of useful tools included in the base version.

Video Editing on Mobile – Advantages
Cost
We all already have a smartphone that can be used for video editing, Unlike camera quality – which can influence which phone you choose, it doesn’t really matter which phone you use for editing.
Even though apps may look slightly different on Android versus iOS, in the end it’s mostly a matter of interface and design.
In addition, there are many free editing options on mobile – for example inside Instagram or TikTok,
I don’t personally recommend these options because they are significantly less convenient, but if cost is your main consideration, they are completely free.
Mobility
As we know, a phone allows you to edit anywhere, and for many people this is a major advantage.
Ease of publishing
Editing on your phone makes the entire process very seamless: you film on your phone, edit on your phone, and upload directly wherever you want.
When editing on a computer, you usually need to transfer the video back to your phone before uploading, because mobile apps offer features that desktop uploads don’t – such as adding music from the platform’s library or choosing a thumbnail for your profile.
Video Editing on Mobile – Disadvantages
Performance
Mobile editing apps are generally much less advanced in terms of capabilities.
While many apps include gimmicks that make it feel like they offer a wide range of features – such as filters and effects, they are still not a substitute for the broader capabilities of desktop editing software.
Ease of use and physical strain
We already spend most of our time on our phones, and editing on a smartphone is not ergonomic.
It requires leaning into a small screen and using your fingers for precise editing on a device that isn’t designed for that level of detail.
It may feel minor at first, but over time there is a cumulative effect, and it’s not ideal for your body.
Recommended App for Mobile Editing
The app I recommend for editing videos on mobile is CapCut.
CapCut is owned by ByteDance, the same company behind TikTok, and these are the reasons I specifically recommend it:
Cost – CapCut has a free version and a paid version. The free version is completely sufficient to start with.
Innovation – CapCut is frequently updated with new features, I personally enjoy experimenting with new creative tools and being early to use them.
Integration with TikTok – CapCut was designed to complement TikTok, so the two platforms work seamlessly together. Many editing trends are based on templates that exist only in CapCut, and once you finish editing, you can upload directly.
To download CapCut, search for it in your phone’s app store.
Part 6 - Distribution
?Where should you publish your videos
Congratulations – you’ve reached the final stage and you’re about to publish your video.
Many business owners feel that this is the most difficult and overwhelming part of the process, often feeling unsure or stuck when they get here.
If that resonates with you, I have good news: the hardest part is already behind you.
Publishing your video is actually the easiest step in the entire process!
At this point, your main task is simply to decide which platform to upload it to.
Not sure how to choose?
Let’s go over the differences between the main platforms and what type of content works best on each one.
The first social network that transformed our lives and was the first to bring “online” into our everyday routine on a massive scale.
Even today, it remains one of the leading social platforms in terms of active users, despite the rise of competitors in recent years.
Because of this, it still has a lot to offer for content distribution and business exposure.

Who is on Facebook?
Because Facebook is the oldest and one of the most popular social networks, the audience here is very broad:
me, you, your aunt, my aunt, Kyle from the neighborhood group, Rose from the school committee…you get the idea.
That said, very young audiences are usually less present on Facebook.
The platform tends to be used mostly by people aged 22 and above, so if your target audience is very young people only, you’ll need to think carefully about whether it’s worth investing in this platform and adjust your strategy accordingly.
Where can you use videos on Facebook?
Facebook Reels
Following the success of Instagram Reels, Facebook introduced the same format in 2022, allowing creators to gain viral reach and exposure – something that wasn’t widely available before Reels.
You can upload Reels on Facebook both on your personal profile and a business page.
However, just like with regular posts, reach on a business page is significantly lower compared to a personal profile.
Facebook Videos
Alongside Reels, Facebook still supports longer-form videos uploaded in a standard format.
These are usually between 5–20 minutes (roughly speaking), and they appear as regular posts on your page.
Their reach is generally much lower than Reels, but that doesn’t mean the format is less useful – it simply requires proper expectations depending on your goals.
A visual-based social network, where the core is strongly aesthetic and image-driven.
In the past, Instagram was mainly a platform for photos. Today, the majority of content on the feed is short-form video (Reels).
Instagram today is primarily a marketing platform and the people who invest in succeeding here are usually those who have something to gain from their presence: influencers, business owners, and brands.
You don’t need a large following on Instagram to market and sell.
The platform is built on a constant game of follow/unfollow, and you shouldn’t let that hold you back. Your content can reach people who don’t follow you, and your follower count is not a score.

Who is on Instagram?
There are several key audience types on Instagram:
1. Younger audience (teens to early 20s)
At these ages, users typically follow pages they like, interact heavily with content-commenting, tagging friends, replying to stories and use DMs frequently, even to form new connections.
2. Female lifestyle & design audience
A large segment of Instagram users are women who enjoy lifestyle, aesthetics, and design content.
Of course – Instagram is not exclusively for women but it is a dominant group.
3. Entrepreneurs, creators, and business owners
This includes people who actively grow their Instagram presence- business owners, influencers, and content creators.
A big part of success here comes from relationship-building, engagement, and staying active within your niche.
Where can you use videos on Instagram?
Reels
Following the massive success of TikTok which peaked around 2020, Instagram quickly launched Reels – it’s own version of short-form, entertaining video content.
They didn’t just copy the format-they also adapted the algorithm, so like TikTok, distribution is based on engagement and interest, not follower count.
Today, Reels are so central to Instagram that it’s rare to see videos longer than a minute.
Stories
Instagram Stories allow you to share content that disappears after 24 hours.
Many business owners and creators love this format because it feels less polished and more spontaneous, which reduces perfection pressure.
Stories are also a powerful way to share your daily life, show up in a more authentic way, and build a deeper, warmer connection with your audience.
Live
Instagram Live is exactly what it sounds like: a real-time video broadcast.
During a live session, your audience can comment and ask questions, making it a great format for engagement, teaching, and direct communication.
It’s also the only format on Instagram where the platform actively notifies your followers, meaning it has strong built-in reach potential.
TikTok
TikTok is the fastest-growing and most trend-driven social network in recent years, and the platform largely responsible for the rise in popularity of video content across all social media today.
It’s no surprise that many brands, companies, and business owners invest significant resources into growing on TikTok and include it as part of their overall marketing strategy.
The shift TikTok created is so big that you don’t even need to be on TikTok to be influenced by it, all the short videos you see on other platforms and many of the new influencers who have emerged in recent years all started on TikTok.
So even if you’re not active on the platform, chances are your exposure to it is much higher than you think.

Who is on TikTok?
The common belief about TikTok is that its audience is very young, and therefore many businesses assume they have nothing to gain from being there.
Of course, that hasn’t been true for a long time – because if my partner’s father has TikTok, you can be sure pretty much everyone does.
That said, younger generations definitely set the tone and culture of the platform, so if you want to be active and create videos that perform well, you first need to invest time in understanding the world, trends, and language of TikTok.
Where can you use videos on TikTok?
TikTok is a social media platform that is mostly video-based, so the question isn’t really relevant,
video is the main type of content on TikTok.
YouTube
Although it is often included in lists of social networks, YouTube is actually an entertainment platform whose main purpose is video distribution, not social interaction or maintaining relationships.
It is also the least utilized platform among business owners, and there is a reason for that:
succeeding on YouTube requires consistent effort in producing relatively high-quality videos, as well as patience during an initial phase where views and engagement may be low.
However, those who push through this early stage can experience strong long-term growth and more importantly, ongoing visibility in top Google search results.

Who is on YouTube?
Very young audience
This is where you’ll find very young viewers including children watching content created specifically for them.
This audience is mainly interested in age-relevant topics such as gaming, family YouTube channels, and beauty/lifestyle creators.
Casual search-based audience
Most adult users on YouTube are “intent-driven” viewers.
They come to the platform looking for help with a specific need or question, such as:
- How to disassemble a Bosch 9kg washing machine (WAU28T model)
- How to stop a cough quickly
- How to potty train a child in winter
As random as these examples may sound, if you are – for example – a parenting coach specializing in potty training, this is an incredibly powerful way to reach your exact target audience at the moment they need you.
Where can you use videos on YouTube?
Like TikTok, YouTube is a video-based platform.
However, today there are two main places where you can publish content:
1. Regular YouTube Channel
This refers to traditional long-form videos. Everything explained so far applies here.
2. YouTube Shorts
This is YouTube’s version of Reels and TikTok – short-form vertical videos with similar logic and distribution style.
Ideally, an active and growing YouTube channel uses both formats.
If you’re creating long-form content, you don’t even have to create separate Shorts (although it is recommended).
You can simply cut the most interesting parts from your long videos and use them as Shorts to drive viewers back to your full content.

Well done, you’ve reached the end of the kit!
I highly recommend saving this email or the link so you can come back to it whenever you need it.
This information isn’t meant to be read in one go, but rather to support you whenever you need guidance along the way.
If you have any questions, I’m available via the email you received the kit from – just hit reply and write to me.
You’re now part of my valued mailing list, so I’ll see you in upcoming emails, and of course, as always, on the feed.
Hadas Kellner